XML이란
XML이란 한마디로 웹에서 사용되는 구조화된 문서와 데이터를 표현하기 위한 보편적인 포맷으로, HTML과 같이 태그에 기반한 마크업 언어를 정의할 수 있는 체계이다. HTML과 마찬가지로 SGML에 그 뿌리를 두고 있으나, SGML에 비해 훨씬 단순하고 엄격한 규칙을 적용한다.
XML은 HTML과 같이 특정한 태그들의 문법을 지칭하는 개념이 아니라 새로운 문법을 정의하여 새로운 마크업 언어를 만들어 낼 수 있는 체계이며, 그 체계에 의해 만들어진 새로운 언어들이 XML 체계가 제시하는 기본적인 조건을 충족할 때 XML이라고 이야기한다.
가령, 음악을 표현하기 위한 MusicXML, 수학 식을 나타내기 위한 MathML, 화학식을 나타내기 위한 CML(Chemistry Markup Language), WAP 환경의 무선 인터넷을 위한 WML(Wireless Markup Language)등은 모두 XML에 기반을 두고 만들어진 새로운 마크업 언어들이다.
마크업 언어가 XML이 되기 위해서 만족시켜야 하는 조건을 HTML과 비교하여 살펴보면 다음과 같다.
1. 하나의 루트 태그를 가져야 한다. 즉, HTML에서의 <html>과 같은 가장 바깥쪽에 있는 태그가 하나여야 하고, 그 앞과 뒤에 태그가 나올수 없다.
2. 모든 비어있지 않은 태그들은 시작 태그와 끝 태그가 정확하게 일치해야 한다(즉, 대소문자가 구별된다).
3. 모든 빈 태그들은 <br/>와 같이 빈 태그 표시가 되어 있어야 한다.
4. 모든 태그들은 overlap 없이 모두 nesting되어 있어야 한다. 즉, <p><b>...</p></b>와 같이 overlap이 일어나면 안 된다.
태그의 이름이나 내용과 관계 없이 위의 네 가지 조건에 맞는 태그 문법을 정의하면 그것은 XML에 기반하여 정의한 마크업 언어가 된다. 이것을 XML 용어로‘well-formed XML’이라고 한다.
XML은 단지 웹 환경만을 위한 표준이 아니라 인터넷 전반에서 데이터를 생성, 저장, 변환하기 위한 보편적인 표준으로 자리잡고 있다. 다음에서는 XML이 웹 환경에서 적용되고 있는 실례를 살펴보기로 한다.
웹에서의XML 응용1 - XHTML
XHTML = XML + HTML?
사례 1 : 2001년 3월 IBM이 웹사이트를 리뉴얼하여 새로 오픈하였을 때, 방문자들은 웹의 미래를 목격하고 있었다. IBM의 새 사이트는 모두 XML 기반의 CMS에 의해 동작하며, 모든 페이지는 XHTML로 코딩되어 있었다.
사례 2 : 2001년 10월 25일 넷스케이프 네비게이터나 오페라 등 인터넷 익스플로러 이외의 브라우저를 사용하는 사용자들은 MSN 사이트에 접속하는 데 어려움을 겪었다. MS 측에서는 이것이 MSN을 XHTML로 리뉴얼하는 과정에서 다른 브라우저들이 XHTML을 제대로 지원하지 못하기 때문이라고 주장하였고, 다른 브라우저 제작사들은 MS가 XHTML의 표준을 잘못 적용시켜 MSN을 디자인하였기 때문이라고 주장하였다.
위의 두 사례들은 미국의 거대 웹사이트들이 XHTML이라는 표준으로 이미 이행을 시작했다는 것을 보여주고 있다. 그렇다면 과연 XHTML은 무엇인가?
HTML은 잘 알려진 대로 SGML에 기반을 둔 포맷으로 1992년의 버전 1.0부터 현재의 버전 4.01까지 10년 가까이 발전해 오면서 기본적인 틀에는 변화가 없었다. W3C(World Wide Web Consortium)에서는 HTML 4.0의 다음 버전을 준비하면서 기존의 SGML 기반의 구조 대신 XML을 기반으로 정의하기로 했고, 이 결과로 확정된 것이 XHTML이다. 즉, XHTML은 HTML을 계승하는 표준으로, 앞으로 더 이상 HTML의 다음 버전은 나오지 않는다는 것이다. 그렇다면 XHTML이 HTML과 다른 점은 과연 무엇인가?
첫번째로 XHTML은 well-formed XML로 표현되어야 하기 때문에, 앞에서 설명한 well-formed 조건을 만족시켜야 한다. 이것은 다음과 같은 조건을 포함한다.
•빈태그의 경우 <br/>와 같이 표시해 주어야 한다.
•빈태그가 아닐 경우에는 반드시 닫는 태그가 있어야 한다.
• 어트리뷰트의 값은 항상 따옴표 안에 들어가 있어야 한다.
• 어트리뷰트 미니마이징이 불가능하다. 즉, <input type="checkbox" checked>는 틀린 문법이고, <input type="checkbox" checked="checked" />와 같이 사용해야 한다.
•모든 &를&로 바꾸어 주어야 한다. 특히 URL의 파라미터 기술시 조심해야 한다.
XHTML 문서가 되기 위한 또다른 조건은 앞부분에 Doctype 선언이 되어야 한다는 것이다. Doctype은 XML 문서가 어느 DTD에 따르고 있는지를 표현하는 태그로, XHTML에는 세가지 DTD가 존재한다. 다음은 각각의 DTD와 그에 대응하는 Doctype 선언이다.
1. Strict
<!DOCTYPE html PUBLIC "-//W3C//DTD XHTML 1.0 Strict//EN" "http://www.w3.org/TR/xhtml1/DTD/strict.dtd"> Strict DTD는 모든 포매팅이 CSS(Cascading Style Sheet)에서 이루어질 때 사용한다. 이는 즉 <font>나 <table>을 통해 브라우저에서 어떻게 디스플레이 되는지에 대한 내용을 포함하고 있지 않은 DTD이다.
2. Transitional
<!DOCTYPE html PUBLIC "-//W3C//DTD XHTML 1.0 Transitional//EN"
"http://www.w3.org/TR/xhtml1/DTD/transitional.dtd">
Transitional DTD는 HTML이 XHTML로 이행하는 과정에서 사용될 DTD로 앞으로 상당 기간은 이 DTD가 사용될 것이다. Transitional DTD는 XHTML 내부에서 포매팅 정보를 표현하는 것을 허용한다.
3. Frameset
<!DOCTYPE html PUBLIC "-//W3C//DTD XHTML 1.0 Frameset//EN" "http://www.w3.org/TR/xhtml1/DTD/frameset.dtd">
Frameset DTD는 이름에서 볼 수 있는 것과 같이 문서가 Frameset을 가지고 있을 때 사용되는 DTD이다.
XHTML, 꼭사용해야하는가?
실제로 작업해 보면 XHTML은 어려운 표준이 아니다. 기존에 별다른 규칙 없이 아무렇게나 작성하던 HTML에 비하면 작성하기 힘들다고 느껴질 수 있겠지만, 곧 XHTML을 적용했을 때 얻는 이점이 훨씬 크다는 것을 금방 느낄 수 있을 것이다. 점점 더 많은 HTML 작성 툴들이 XHTML을 지원하고 있고, XHTML로 작성된 문서의 에러를 찾아주는 툴들도 속속 등장하고 있다.
현재 운영하고 있는 페이지들을 지금 당장 XHTML로 바꾸어야 할 이유는 없다. 그리고 현재 일부 브라우저들의 경우는 XHTML을 읽어 보여주는 데 약간의 어려움이 있다. 하지만 새롭게 제작되는 사이트들은 지금부터 XHTML을 적용하여 제작하는 것이 앞으로 인터넷의 발전 방향으로 볼 때 제작시의 효율 면에서나 앞으로의 관리 측면에서 더 큰 이익을 가져다 줄 것이다.
XML의응용2 : XSLT
XSLT(XSL Transformation)은 XML을 위한 스타일시트 언어인 XSL(Extensible Stylesheet Language)의 일부로 XML을 다른 구조를 가진 XML이나 HTML 그 외 다른 포맷으로 변환하는 기능을 담당한다.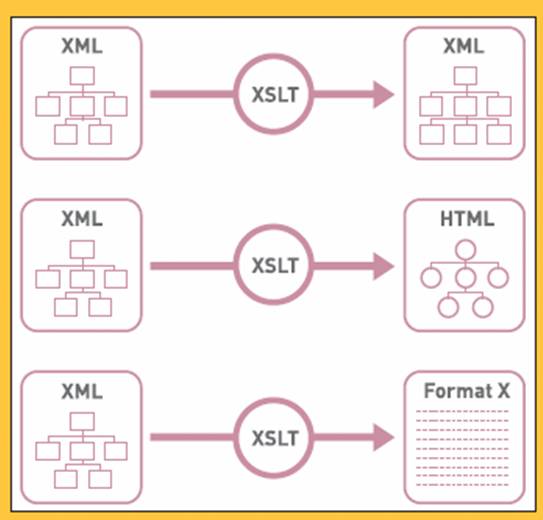
앞에서도 언급하였지만 XML은 웹상에서 사용될 때에는 주로 컨텐츠를 기술하는 역할을 담당하는데, 현실적으로 컨텐츠의 내용에 따라 구성된 모든 DTD를 지원하는 브라우저를 만든다는 것은 불가능하다. 그래서 XML로 표현된 컨텐츠를 실제 사용자가 볼 수 있는 HTML 등의 포맷으로 변환하는 과정이 필요하게 되는데, 이를 담당하는 것이 바로 XSLT이다.
웹사이트의 제작에 있어 XSLT는 디자인 템플릿을 기술하는 목적으로 주로 사용되며, 같은 종류의 컨텐츠에 일관된 디자인 템플릿을 적용시킴으로써 사이트 전체의 디자인 일관성 유지를 통한 웹 아이덴티티 확립에 크게 도움을 준다.
또한 XSLT의 가장 큰 특징은 HTML로의 변환 뿐 아니라 다른 구조의 XML이나 XML이 아닌 포맷으로의 변환이 자유롭다는 것인데, 이런 특성으로 말미암아 같은 컨텐츠를 웹사이트(HTML)와 무선인터넷(WML, mHTML) 등 디바이스 플랫폼에 따라 다른 디자인 템플릿을 적용시킴으로써 다양한 플랫폼의 지원이 필요한 웹사이트 제작시 유용하다. 또한, 디자인 템플릿과 컨텐츠가 분리됨으로써 사이트 디자인 업데이트시 XSLT로 작성된 디자인 템플릿만 새롭게 제작하면 되기 때문에 효율을 극대화할 수 있다.
XML/XSLT를 통한 컨텐츠와 디자인 템플릿의 분리는 요즈음 인터넷 업계의 또다른 기술적 트렌드인 CMS(Content Management System)과 긴밀한 관계를 가지고 있다. 웹사이트를 위한 컨텐츠의 생성/저장/수정/배포를 종합적으로 관리하는 CMS들은 기존 제품의 경우 자체적인 템플릿 언어들을 가지고 있었고, 웹사이트를 만드는 사람의 입장에서는 각 CMS의 고유 템플릿 언어를 배우기 위해 많은 시간과 노력을 투자했어야 하는 것은 물론이고, 고유 템플릿 언어들의 한계로 인하여 CMS를 도입한 웹사이트 제작에 어려움을 겪은 것이 사실이다. 그러나 현재 추세로 볼 때 CMS가 컨텐츠를 XML로 관리하고 디자인 템플릿을 위해 XSLT를 사용하는 것이 표준화되고 있고, XSLT가 기존의 어떠한 고유 템플릿 언어보다도 강력한 기능을 제공해 주기 때문에, 이제 웹 디자이너나 개발자들은 표준화된 한가지 템플릿 언어만 습득하면되는것이다.
다음은 간단한 XML과 XSLT의 샘플과 그 결과 화면이다.
XML 파일
<?xml version="1.0" encoding="euc-kr"?>
<notice>
<notice_item>
<id>1</id>
<title>[새 메뉴 안내] 달려라 KTF!, 나는야 코팀파!</title>
<date month="12" day="7"/>
</notice_item>
<notice_item>
<id>2</id>
<title>[16강 월드 챌린지] 당첨자 발표!! </title>
<date month="12" day="3"/>
</notice_item>
<notice_item>
<id>3</id>
<title>KoreaTeamFighting.com [무선 컨텐츠서비스] 이용안내 </title>
<date month="11" day="17"/>
</notice_item>
<notice_item>
<id>4</id>
<title>오픈 이벤트 대박을 잡으세요!</title>
<date month="11" day="17"/>
</notice_item>
<notice_item>
<id>5</id>
<title>KoreaTeamFighting.com 서비스 안내</title>
<date month="11" day="01"/>
</notice_item>
</notice>
XSLT 파일
<?xml version="1.0" encoding="euc-kr"?>
<xsl:stylesheetversion="1.0" xmlns:xsl="http://www.w3.org/TR/WD-xsl">
<xsl:template match="/">
<TABLEcellSpacing="0"cellPadding="0" width="400" border="1">
<TBODY>
<TR>
<TD colspan="3" height="48" width="410"><IMG src="/images/notice.gif" /></TD>
</TR>
<xsl:for-each select="//notice_item">
<TR>
<TD width="10"><IMG src="/images/blank.hig"
width="10" height="1" /></TD>
<TDwidth="390"><A href="javascript:
notice_pop('<xsl:value-of select="id"/>','149');">[<xsl:value-of
select="date/@month"/>-<xsl:value-of select="date/@day"/>]
<xsl:value-of select="title"/></A></TD>
<TD width="10"><IMG src="/images/blank.hig" width="10" height="1" /></TD>
</TR>
<TR>
<TD colspan="3"><IMG height="1" alt="" src="/images/main_notice_line.gif" width="409"
border="0" /></TD>
</TR>
</xsl:for-each>
</TBODY>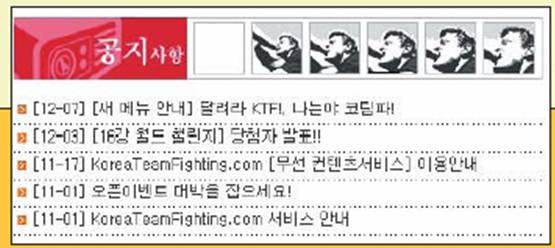
</TABLE>
</xsl:template>
</xsl:stylesheet>
XML과웹의미래
지금처럼 인터넷이 대중화될 수 있었던 배경에는 HTML과 웹 서버를 중심으로 한 웹의 기반 기술들이 배경지식을 갖추지 못한 초보자들도 쉽게 이해할 수 있을 만큼 학습과 실전에서의 적용이 그다지 어렵지 않았다는 점이 크게 작용을 했다. 누구나 웹 서버 한 대와 인터넷 전용선, 그리고 HTML에 대한 기본적인 지식만 있으면 정보 소비자의 입장에서 정보 공급자의 역할을 수행할 수 있었다. 그러나 그 결과로 걸러지지 않은 정보가 난무한 나머지 웹에서 정보를 찾는다는 것은 쓰레기더미에서 보물을 찾는 것과 비슷하게 되어 버렸다.
현재 무선인터넷과 PDA, 정보가전 등 다양한 디바이스 플랫폼이 다양화됨에 따라 PC 상의 브라우저를 통해 접속하는 기존의 웹 환경 이상의 것을정보소비자들에게 제공해야 하는 필요성이 더욱 가중되고 있다.
XML은 웹 환경의 변화에 발맞추어 기존의 웹 환경을 존중하면서 웹의 근본적인 변화를 시도하려는 노력의 산물이다. 이미 XML 혁명은 인터넷의 백엔드로부터 조용히 시작되어 점차 프론트엔드로 확산되고 있다. 웹 기술이 하루가 다르게 발전하고 있다고는 하지만, 실제로 HTML 4.0이 발표된 1998년 이후 웹사이트 제작에 참여하는 모든 사람들이 영향을 받을만한 기술적인 변화는 크게 없었던 것이 사실이다.
그런 의미에서 XML은 웹 디자이너, 기획자, 개발자에게 모두 커다란 도전이 될 것이며, HTML에 비해 학습에 드는 노력의 양이 상당한 만큼 고급 웹사이트 구축에 있어서의 전문성을 구축하는 중요한 차별화 요소로 작용할 것이다.
국내 시장에서 웹 환경의 XML 적용은 아직 초보적인 수준에 머무르고 있는 것이 사실이다. 2001년 새해에는 XML의 활발한 적용이 국내 웹사이트들의 질을 한단계 높이는 디딤돌이 되기를 기대해 본다.
XML을이용한사이트
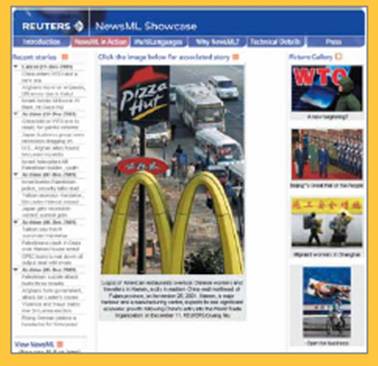 Reuters NewsML Showcase : NewsML
http://newsshowcase.rtrlondon.co.uk/latest/main-0.asp
뉴스의 교환을 위해 만들어진 NewsML의 데모를 보여주는 사이트. 이미 로이터통신은 전세계 수천개의 신문사와 방송사에 공급되는 자사의 뉴스 제공 시스템을 XML에 기반한 표준인 NewsML로 업그레이드하였다. 보여지는 페이지들은 NewsML로 표현된 컨텐츠를 XSLT 템플릿으로 변환한 결과이다.
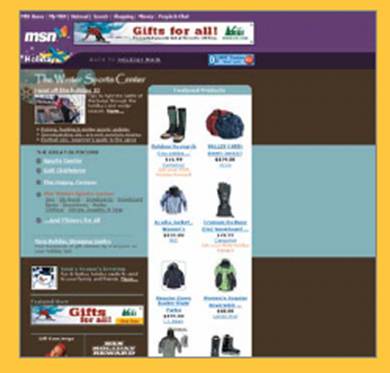
MSN.com: XHTML
www.msn.com
마이크로소프트사의 포털사이트 MSN.com은 2001년 10월부터 XHTML로 서비스를 하고 있으며, XML을 이용하여 Windows XP와 긴밀하게 결합되어 있다.
KoreaTeamFighting.com: XSLT
www.koreateamfighting.com
KTF의 월드컵 사이트인 KoreaTeamFighting.com은 웹사이트와 무선 인터넷에 서 동일한 컨텐츠를 서비스하기 위해 내부적으로 XSLT를 템플릿 언어로 사용하고 있다.
웹디자이너들이궁금해하는XML에대한몇가지질문과답
Q XML은 정말 많이 쓰이고 있는가?
A XML은 이미 우리 생활에 깊숙하게 들어와 있지만, 주로 보이지 않는 곳에서 사용되므로 잘 알지 못하고 지나치는 경우가 대부분이다. 웹디자이너의 입장에서 XML을 접할 수 있는 경우는 다음과 같다.
•마이크로소프트 오피스 XP는 엑셀과 엑세스, 아웃룩에서 XML을 직접지원한다.
•현재 우리나라 무선 통신 사업자 중 SK텔레콤의 nTop과 LG텔레콤의 Ez-I는 모두 WAP 기반의 서비스로 WML이라는 XML 기반의 언어를 사용한다.
•플래시 5의 액션스크립트는 XML 데이터를 로딩하고 핸들링할 수 있는 기능을 제공한다.
•일러스트레이터는 버전 8 이후로 XML기반의 벡터 그래픽 포맷인 SVG(Scalable Vector Graphics) 포맷으로의 익스포트를 지원한다.
•거의 모든 B2B 전자상거래 사이트는 XML을 기반으로 하여 여러 기업간에 표준화된 거래 처리를 할 수 있도록 지원하고 있다.
Q XML은 HTML을 대체할 것인가?
A XML은 HTML을 대체하기 위해 만들어진 것은 아니다. 앞에서 설명한 것처럼 XML은 마크업 언어를 정의하기 위해 제공되는 체계이기 때문에 이미 수천가지 이상의 마크업 언어가 XML에 기반하여 정의되어 있고, 앞으로 그 숫자는 더욱 늘어날 것이다. 어떤 브라우저도 이런 많은 수의 XML 기반 마크업 언어에 알맞은 시각적 표현 방식을 찾아 렌더해 줄 수는 없을 것이다.
더 현실적으로 말하면, XML의 중요한 적용 분야 중의 하나는 웹이고, XML은 이미 HTML을 대체하고 있다. HTML 표준을 관장하는 W3C에서 HTML 4.01 이후의 버전을 더 이상 발표하지 않기로 결정하고 그 대신 HTML을 XML의 기반에서 발전시킨 XHTML 1.0을 권장한다고 발표하였다. XHTML은 HTML을 계승하여 앞으로 계속 발전해 나갈 것이다.
Q 왜 또 다른 마크업 언어가 필요한가? HTML을 계속 확장해서 쓸 수 없는가?
A 웹은 정보를 공유하는 수단으로 발명되었으나, 현재 웹의 근간을 이루고 있는 HTML은 정보보다는 정보가 시각적으로 표현되는 레이아웃과 포맷을 구성하는 데 중점을 두고 발전을 해 온 까닭에 현재 웹상의 대부분의 HTML은 컨텐츠와 포맷이 섞여 있어서, 웹의 발전을 오히려 가로막고 있는 장애물이 되고 있다. 또한 HTML의 표준은 지나치게 복잡해진 상태이고, 브라우저 개발업체에서 자신들의 고유한 기능을 새롭게 도입하는 것을 막을 수 없다. XML은 시간이 지남에 따라 발전할 수 있는 기능 자체를 정의하지 않고, 기능을 정의할 수 있는 체계만을 정의함으로써, 인터넷이 발전함에 따라 필연적인 기능의 추가가 표준을 어기지 않고도 가능한 확장성을 가지고 있다.
Q 컨텐츠와 포맷의 분리는 왜 그렇게 중요한가?
A 컨텐츠와 포맷의 분리가 중요한 이유는 다음과 같다.
첫째, 앞으로의 인터넷은 더 이상 PC 환경의 통일된 브라우저 상에서 서비스되지 않을 것이기 때문이다. PDA, 핸드폰, 텔레비전, 기타 정보가전으로 인터넷 서비스의 대상이 되는 디바이스 플랫폼이 확장되면서, 동일한 컨텐츠를 각 디바이스의 특성에 맞도록 포매팅하여 보여주는 것이 점
차중요해질 것이다.
둘째, 컨텐츠와 포맷의 분리는 machine-readability를 향상시킨다. 즉, 사람이 아닌 소프트웨어가 웹 페이지의 내용을 읽어 필요한 처리를 할 수 있게 되므로 컨텐츠의 가치를 향상시킨다. 예를 들어 더 뛰어난 가격 검색엔진이 가능해지는 것이다.
셋째, 웹 개발에 있어 디자이너와 컨텐츠 관리자의 역할을 명확하게 분리하여 각자가 자신의 역할에만 충실할 수 있게 한다. 컨텐츠 관리자가 컨텐츠를 업데이트하다가 HTML을 잘못 건드려 디자인이 '깨진' 경험, 디자이너가 디자인 업데이트를 하다가 컨텐츠를 실수로 수정한 경험은 누구나 한번쯤 겪어보았을 것이다.
컨텐츠와 포맷을 분리함으로써 디자이너와 컨텐츠 관리자는 서로의 영역을 침범하지 않으면서 자신의 전문 분야에 효율적으로 집중할 수 있게 되는것이다.
Q HTML로 작성된 페이지를 XML로 변환하는 것이 가능한가?
A 두가지답이가능하다.
만약 HTML을 XHTML로 변환하는 것에 대한 질문이라면, HTML과 XHTML의 차이에 대한 리스트가 XHTML 스펙에 함께 제공되고, XHTML 문법을 체크해 주는 validation 서비스도 제공되고 있으므로 HTML을 XHTML로 변환하는 것은 그렇게 어려운 일이 아니다. 또한, XHTML은 좀 더 엄격한 문법을 제시하고 있기 때문에 XHTML에 따라 코딩을 하게 되면 HTML을 지원하는 대부분의 브라우저에서 문제 없이 볼 수 있을 뿐 아니라, 더욱 깨끗한 HTML 코드를 사용하게 되는 효과가 있다. W3C 사이트에서 제공되는 HTML Tidy라는 공개 툴을 사용하여 자동 변환도 가능하다.
만약 HTML을 내용을 표현하는, 즉 MathML이나 Chemical Markup Language와 같은 XHTML 이외의 다른 XML로 변환하는 것에 대한 질문이라면, 불가능하지는 않지만 어렵다고 답하고 싶다. HTML 태그들은 ‘의미’에 대한 정보를 전혀 가지고 있지 않기 때문에 내용에 따라 일관된 HTML 형식으로 코딩이 되어 있다면 어렵지만 가능은 할 것이고, HTML 코딩 방식이 제멋대로라면, 내용을 추출해 내기 힘들 것이기 때문이다.
만약 표준화된 형식에 의해 만들어진 HTML이라면 XHTML로 변환 후에 XSLT를 사용하여 다른 XML로 변환하는 방법을 사용할 수 있다.
Q 앞으로 웹 디자이너는 XML을 배워야 하는가?
A XML의 기본적인 성질을 이해하고, 디자인에 관련된 부분에서의 XML 관련 기술을 습득하는 것은 필요하지만 웹 디자이너가 XML의 모든 자세한 부분을 알아야 할 필요는 없다. XML의 개념을 이해하는 것은 그리 어렵지 않다는 점을 유념하라.
Q XML이 웹 디자이너의 작업에 영향을 미칠 부분은 어떤 부분인가?
A 현재 대부분의 웹디자이너들은 컨텐츠를 HTML 파일로 도출하는 방식으로 일하고 있다. XML에 기반한 웹사이트 제작이 정착된다면 웹디자이너는 컨텐츠와 함께 각 컨텐츠 컴포넌트들의 정확한 구조가 표현된 XML DTD와 샘플 XML 파일을 받아서 이 컨텐츠를 표현할 수 있는 템플릿 디자인을 XHTML(혹은 해당 디바이스 플랫폼에 맞는 형태의 결과물)파일과 XSLT 파일로 만들어내야 할 것이다.
![[Note]](http://openframework.or.kr/framework_reference/spring/ver1.2.2/images/admons/note.png)